How to Design a Zigbee Network for an Indian Home
Plan coordinator placement, always-powered routers, channels against Wi-Fi and RCC walls before you pair a single device, then pair in the right order and know what to check when devices drop.
By Abhi Bavishi, Founder, Smartify
Technical review pending
At a glance
You will learn
- Place the coordinator where it helps the whole mesh
- Build the mesh from always-powered routers before adding battery devices
- Choose a Zigbee channel that sits clear of the Wi-Fi
You need
- Your site survey
- The final hub position decided before pairing
Key takeaway
Put the coordinator near the middle of the home at its final location, build the mesh from always-powered routers, and test room by room because no document can give you a range for your building.
Key terms in this lesson (4)
- Coordinator
- The one device that forms a Zigbee network. In a consumer hub it is built in; in a DIY setup it is a USB radio on a small computer.
- End device
- Usually a battery-powered Zigbee device that talks to a parent and sleeps. It does not relay, so battery sensors do not extend the network.
- Mesh
- A network in which always-powered devices relay messages for one another, so adding routers makes it bigger and sturdier.
- Router (Zigbee)
- A mains-powered Zigbee device that relays messages for others and extends range. Many plugs and bulbs act as routers, and they should stay powered.
Short answer: place the coordinator centrally at its final position, away from the Wi-Fi router and USB 3 devices. Build outward with always-powered routers before pairing battery devices. Plan Wi-Fi first, then choose a supported Zigbee channel, commonly 15, 20 or 25. Test every room because documents cannot predict your building’s range.
Many Zigbee problems begin with placement, switched-off routers or overlapping Wi-Fi. For the buyer’s hub question, see Zigbee hub vs Wi-Fi smart home.
The three roles
| Role | Power | Job |
|---|---|---|
| Coordinator | Always on | Forms the network; there is one |
| Router | Mains, always on | Relays messages and extends coverage |
| End device | Usually battery | Talks to an available parent and sleeps; does not relay |
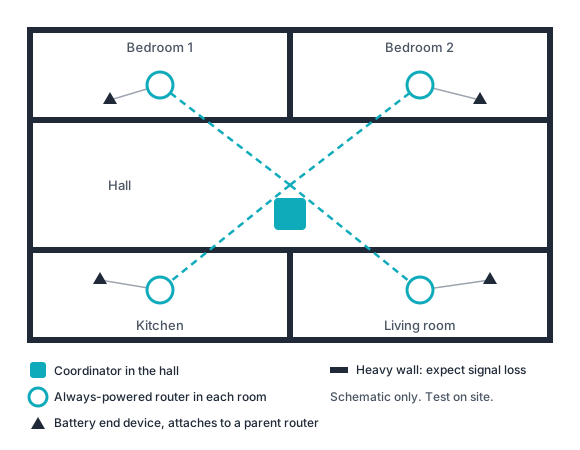
Battery door sensors, motion sensors and remotes do not extend range. The diagram illustrates roles, not a guaranteed topology or a nearest-router rule.
Coordinator placement
Choose the final position before pairing: moving the coordinator can break routes. ZHA recommends a central location away from walls, ceilings, floors, access points and electrical equipment. Keeping it out of metal cabinets and distribution boards is additional practitioner advice.
For a USB coordinator, use a USB 2.0 port and shielded extension cable away from USB 3 equipment. Keep the radio clear of power supplies and the broadband router rather than hiding every box together.
Routers: build the mesh from powered devices
Most mains-powered plugs and bulbs route automatically. Add these before battery devices: a weak mesh can prevent pairing. Plan reliable, permanently powered routers in each room or zone, within reach of another router or the coordinator. This density is a starting point to test, not a coverage guarantee.
A smart bulb switched off at a mechanical wall switch leaves the mesh. Identify the anchor devices in the quote and explain why they must stay powered. Most AC relays without neutral are exceptions to the mains-powered-router rule; check no-neutral modules individually. Mixed brands can also pair poorly, so read compatibility notes and test the combination.
Choosing a channel against Wi-Fi
Both use 2.4 GHz. High Wi-Fi traffic makes coexistence harder; physical separation helps. Survey neighbouring networks rather than assuming your own router is the only source.
- Fix the Wi-Fi channel first where possible. ZHA considers this preferable to changing Zigbee after installation.
- Choose a supported Zigbee channel. ZHA recommends 15, 20 or 25; Zigbee2MQTT also includes 11. Channel 11 overlaps Wi-Fi channel 1. Channel 26 may avoid more interference but many devices do not support it.
- Check Bluetooth, wireless peripherals and other hubs as possible interference sources. Power off other Zigbee hubs while pairing.
- Set the channel before pairing. Later changes must reach sleeping devices when they wake; some devices need re-pairing.
Size, hops and limits
Read the specific hub’s hardware and firmware limits. Do not promise a universal device count or hop limit. Build with routers so the coordinator is not every device’s only parent.
RCC walls, slabs and range
Concrete and steel interrupt coverage. A router vendor’s approximate Wi-Fi figures put a reinforced concrete slab or roughly 30 cm bearing wall at 20 to 25 dB loss, compared with about 3 dB for untinted glass. These indicate scale only; Zigbee transmit power and receiver sensitivity differ.
Plan routers on each floor and near stairs as practitioner starting points. Test far bedrooms, balcony doors, terraces and devices behind metal plates, with end devices where they will live.
First pairing order
- Fix the coordinator position and network settings.
- Pair powered routers from nearby positions outward, at their installation spots.
- Pair battery devices at their final locations.
- For a failed interview, retry near a router or coordinator, replace a weak battery, and retry two or three times before assuming a fault.
- Check the network map and actual device responses.
When devices drop off
First check whether a router lost power and restart the affected device. Check coordinator movement and new radio interference; add a router to improve both directions. Battery devices can be absent from maps yet still report. Judge operation, not unexplained RSSI or link quality readings. After a channel change, ZHA allows up to an hour for reconnection; power-cycling battery devices can help.
Handover record
Record coordinator position, Zigbee and Wi-Fi channels, anchor routers that must stay on, and the final map date.
Where to go next
Check yourself.
Questions from real jobs. Think first, open the answer, then say how you did. The score is for you and stays on this device.
A smart bulb sits behind a mechanical wall switch and someone switches it off at the wall. What happens to the mesh?
The bulb drops out of the mesh, because routers are meant to stay powered.
Do battery door sensors extend the range of the network?
No. They are end devices that talk to a parent and sleep, so only always-powered routers extend the mesh.
Sources
- Home Assistant: ZHA (Zigbee) integration
- Zigbee2MQTT: improve network range and stability
- Zigbee2MQTT: Zigbee network configuration (channel, PAN ID)
- Zigbee2MQTT: FAQ
- Oscium: ZigBee and Wi-Fi coexistence
- Keenetic: Wi-Fi signal attenuation through different materials
- Silicon Labs: multiprotocol Wi-Fi coexistence fundamentals
- CSA: Zigbee overview